
CLEANING THAT S&W M&P .380 SHIELD EZ

By MARJ LAW
“You’re going to talk about cleaning the .380 after all this time?” asks Joe.
“Hey, it’s only been four months!” Really. Most people don’t take apart and clean their handguns quite so frequently, but Joe is such a stickler.
Last time, we noted that fieldstripping this EZ is like taking apart many other handguns including: the new Sig Sauer P365 X-Comp, the Heckler & Koch VP series, the FN 509, the Sig P320 and the Springfield XD series. If you need this information, look in the last week of The Wakulla Sun.
Like all guns, you begin by making certain the gun is empty of rounds. Point the gun in a safe direction, dump the magazine and inspect the chamber. Empty? Now, like we did last time, take the gun apart. You’ll have a lower and a slide assembly.
To clean your gun, find a comfortable table and chair. The table must be impervious to solvents, so don’t use your dining room table! Even if you put newspaper and plastic over your table: don’t do it! One of these days, I’m going to wheedle Joe into refinishing our dining room table. Oops. Cleaning on that table was a big mistake.
We can’t seem to kill the Corian counter or the outside wood picnic table, so these are great places to clean. Assemble all your materials ahead of time, so you’re not tempted to stop in the middle of your task. It’s good to finish the project and put your gun back together. Gun pieces can get lost!
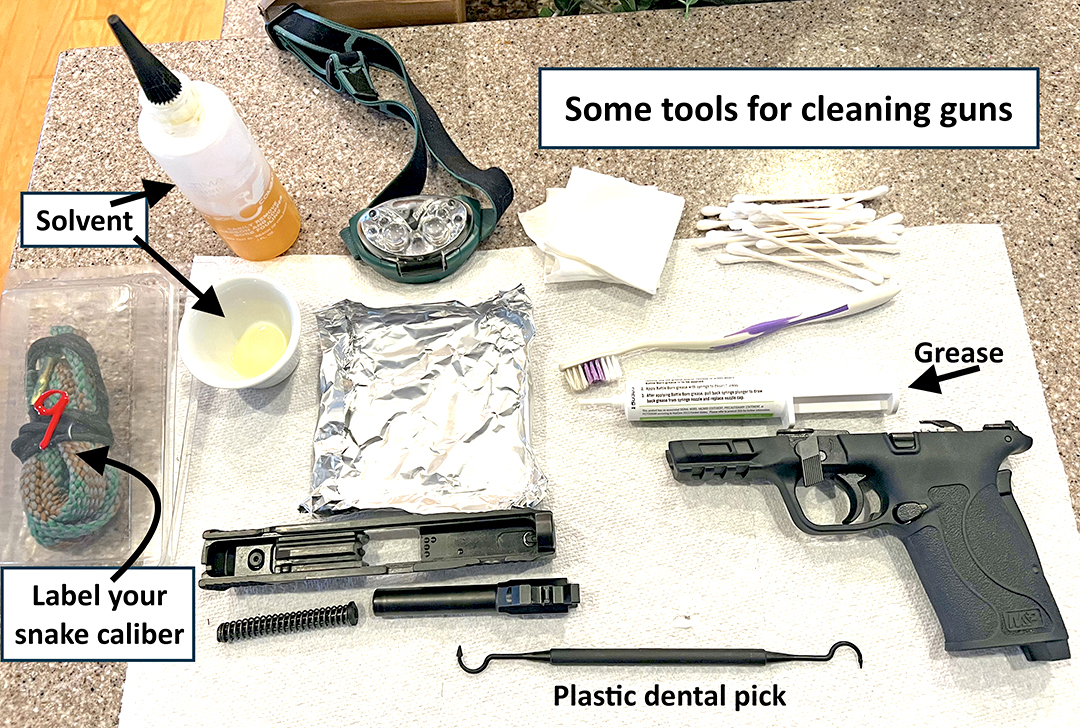
Materials? You need a good solvent. Get a synthetic one. Ole’ Hoppe’s has been used for years, but it makes my nose run, eyes water, and sneeze. That doesn’t happen with a synthetic one, so ask your local gun shop for a good synthetic. Also needed is a good tube of lube, a tiny container to hold the solvent you’ve picked, small patches of T-shirt material, cotton swabs (and get the good ones that don’t leave fibers all around), a plastic dental pick, a snake made for your gun’s caliber, a toothbrush (not the one you use!) a headlamp to attach to your head so you can see what you are doing, and a square of aluminum foil where you’ll place your dirty materials.
Put these all on a few squares of paper towels. It helps to see what you have assembled.
Put your gun’s lower aside. We’ll start working on the slide assembly first.
Carefully remove the recoil spring. Take out the barrel.
Dip a piece of cotton into the solvent, and wipe the spring all over. Put it aside and address the barrel.
We’ll begin by running the snake through it. There’s a rough spot on the snake between the fabric and the thin shoelace part. Put this rough part in the solvent. See the barrel’s black ramp? This is where you drop in the snake, thin shoelace part first. Pull the snake all the way through the barrel. Yes, it might be a little snug.
Using the light of your headlamp, look down the barrel. Is it shiny and clean? No? If you see tiny black particles, run the snake through again. Do this until the barrel is completely clean.
Now for that black ramp. Dampen another cotton square with solvent and rub that ramp. Notice there’s shiny metal beneath all that black? Shiny metal is your goal. Rub until all the black is gone.
Now, take another piece of dampened cloth and clean all around the mouth of the barrel. Then rub all around the exterior. Done!
Pick up the lower. Notice the grooves where the upper and lower fit together. These grooves need to be cleaned well.
I use a dampened square of cotton and that plastic dental pick. Rub these grooves until your piece of fabric has no more black residue.
Between the pick and the cotton, clean the rest of the grooves inside the lower. Take your time. There are a lot of places for the shooting residue to hide! Remember to clean around the hole where the firing pin comes through. Lots of grime collects there.
Now, look in your manual. It will say where to lube your gun. Remember especially the grooves where the upper and lower meet. Squeeze grease into these grooves. But wait! Not too much grease! After you grease, take a cloth and wipe out any excess. You don’t want to see any blobs of grease: they will attract shooting residue and can make it harder for the upper and lower to slide against each other.
Now for the upper. Again, clean out all grooves and into the magazine well. Just like the lower, pay attention to the grooves where the lower rides against the upper. Clean them well, and then grease them too.
After cleaning, make sure you’ve checked your manual so that you’ve greased everything needing it. Also, inspect each piece. Do you notice any place where the bluing has worn off? This means the finish in that area has rubbed off. Protect it by wiping on a thin layer of grease.
Cleaning is done! Yay! Put your gun back together. Remember to keep your hand off the grip safety of this .380 when you put the slide on the gun. Otherwise, the slide won’t lock back like you want it to. Then, once you’ve locked back the slide, you can move the takedown lever to its original spot: parallel to the slide. What now?
You’re done!
Pointing in a safe direction, pull the trigger. Hear the click? That means you put it all back together just right!
These particular handguns are pretty easy to take apart and clean.
And you were worried that this would be an awful chore.
Don’t you feel virtuous now?
Marj Law is the former director of Keep Wakulla County Beautiful who has become an avid shooter in retirement.